Giving a GREAT Pilates class while attending to a myriad of body types and needs.

This post is in response to a very thoughtful question posed on the Skillful Teaching FB page.

Here’s the question:

I desire to be attentive to each and every student and their needs. However, I struggle with the desire to also give a great class to each level attending. How do I let go and give the information but protect each student’s bodies ie) osteoporosis, disk issues, etc while continuing to give the more fit students a great class??

First of all, I have to say this is one of the most common questions I get asked both from my coaching, mentoring teachers and my teachers in training. And it can be one of the toughest things to do, no doubt.

To start us off I thought I’d direct you to a post that I wrote last year on planning for sessions and multi-level classes.

https://skillfulteaching.com//?p=1214

It’s another good resource…


There are, in my experience, a variety of tools one can use to help mitigate the wide range of needs and abilities in a class and some of them are determined by the size of the class.


Know Your Limits & Set Limits

For instance, when I was teaching in a gym situation (20-30 people to a class), we always had the classes designated by levels, but inevitably beginner students would come into an intermediate or advanced level class. My best advance in this situation is to greet every student at the door, or approach your newbies individually before the class starts, and check-in with them. If they are a beginner in a intermediate or higher class you have a responsibility to advise them against taking the class. If they have injuries that cannot be attended to in your class, you have the same responsibility.

You can offer them a complimentary 30 minute session after the class or at another time to help them determine what class would be appropriate or get them started in their practice or you can simply recommend the more appropriate class. THIS IS YOUR OBLIGATION! Be kind and compassionate and gracious, but don”t be afraid to make someone mad or upset. Better mad than hurt!

But onward…

Other ways in which we can be clear about our limits is to set limits. One of the best ways we can attend to the needs of our students while honoring our own ability is to designate class levels or abilities and limit class size.

I know this may seem rudimentary, but many of us find ourselves in situations where we are teaching a larger group than we can successfully or comfortably manage and a class so varied that we can barely do anything with them do to the infinite limitations of the collective group.


Be Prepared

What I find helps me most to create a dynamic class with various levels and/or body types is to be as prepared as possible. Whereas I typically do not pre-plan my classes or sessions any longer, I DO make time to prepare those few classes where I know I have students with specific concerns or issues.

What I do:

  • Discuss precautions and concerns with your students who need it beforehand either in private sessions or before class. If you will be introducing a new exercise that will be inappropriate for that student tell them in advance that you will have them do a modification or something else they are familiar with.
  • I make sure that every exercise I teach has a strong and appropriate modification that can be given to those who need it. This way I can offer challenge to every level no matter what I am doing and no one is left behind.
  • I am succinct in my instruction as to who each exercise variation is appropriate for, setting the students up in advance with necessary props or tools (ie before class even starts!)
  • I typically choose a fundamental theme that I want to focus on in advance and make every exercise revolve or come back to this “focus”. This way even if my students are doing variations of the same exercises they are all going as deep as they can.
  • Don”t be afraid to choose different exercises for certain students.
    • For instance, if someone is doing leg pull up (or sometimes called leg pull back) I can have other students doing bridge. I am never afraid to give students different things to do if I think these different exercises will allow them each to access the same range of motion, strength, flexibility etc.

Examples:

    • You have an intermediate group, but one or two people have osteoporosis. You want to do the ab series. So go ahead, but first be explicit about how those students who won’t be flexing up need to work.
    • You want to do planking, but you”ve got students On the calendar in the back, he scratched out the best horoscopes with uniform slashes and dots. who have wrist concerns. Demonstrate the challenging variation of planking on the forearms OR just have everyone do it on their forearms. It”s not easier, I’ll tell you that and they should know they are not getting off easy!


Change Your Pace

One of the most successful tools I have ever used is slowing down. No matter how big or small a class is, I have found that I can take a single moment, phase of movement or position and have my students stay in it, explore it with thoughtfulness based on what I am trying to get them to feel or build and they get tremendous results!! They don”t have to be doing the super advanced exercises, go fast or be in flow. All they have to do is stop or slow down and explore a piece more deeply to feel the work in it.

I find that if I have a wide range of abilities or students with specific issues I can choose a movement or phase etc. that is appropriate for all of them and make them work it! slow and deep while I talk to them about finding out in their own bodies what is appropriate, what their own experience is and making it the best they can in their bodies.

This takes the ego out of it for them. It’s no longer a competition, it’s an exploration, everyone on the same page, working to find what’s best in their bodies. I”ve always found this to be profoundly effective and students love it!


Don’t Be Afraid

I know many teachers advise against specifically calling out students who need corrections or more help or assistance, but I think there is no better thing you can do in a class situation. You have a strong desire to give your students something great and they want to work hard for you. They will almost always over perform in order to prove that they can either to you, themselves, or the person next to them. I believe it’s important to talk to each student directly about what is appropriate and what you expect of them even in the middle of class!

How do you do this?

  • Be specific
  • Use their names
  • DO NOT point out their limitation direction (“Kathy, you can”t do this because your neck is weak.”)
  • Use humor
  • Make it interesting and important what you are asking them to do.
  • Get them to see the correction, modification/variation as a challenge or a way to go deeper into their particular body.
  • Instead of shouting out their name across the room, kneel down close to a student who might be more self-conscious and whisper their personal instructions to them.
  • Say it with kindness and compassion
  • Say it with the knowledge that this will get them where they need to go.
  • Walk up and offer a prop without saying anything at all. Just offer a smile.

Examples:

  • “Kathy, I want you to do this with feet on the floor and head down focusing on that deep ab connection.”
  • “Mike, go ahead and lower your head but add a leg lower and lift here as long as you can keep your neck at ease…I’m watching you!”
  • “Sarah, it’s fine for you to take this to the next level and lift both legs.”
  • “Karen, I want you to see if you can find that deep pelvic stability with only one leg up. Then switch.”
  • “Bob, come into bridge instead and work to go deeper into your hamstrings. You can even lift your heels.”
  • “Christina, in order to facilitate that connection to shoulder stability I want you to see how deep you can go into your abs without curling up and keeping your neutral spine.”


Trust What You Know

Here’s the thing: You know you want everyone to feel great! You know you want each and every one of your students to succeed and get what they need out of your class. And you know they trust you. Now you have to trust yourself. If you exude intention, your students will go where you lead them knowing that they are in good hands!

Make changes midstream, talk about what you’re doing and why your’e doing it, help your students to see that they can go deeper and get stronger with any exercise and with any limitation with your guidance.

Don’t be afraid to trust your training, your knowledge and intuition.

Tell your students why you”re doing what you”re doing. Be the boss. Love them, love what you do, teach with your heart and a firm plan and you will not fail them and you will not fail yourself.

And when in doubt, it’s okay to not know. Use moments of uncertainty or stuckness to say “I’m going to figure out the best way for you to do that exercise and strengthen your body just where you need it.” You can say this during class or after class in a private conversation. You can also say “Suzie, for now I want you to rest, but next week I”ll have a great replacement exercise for you that will take you even deeper.”


This topic could go on and on and I am happy, happy to continue to discuss it. If you have specific questions or need guidance with a certain issue or situation JUST LET ME KNOW. Comment below and I”ll respond directly.

With gratitude,

Chantill

Straight Talk About Movement in The Pelvis…

A brief description of how the pelvis moves:

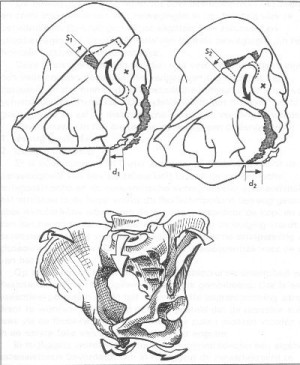
Movement of the pelvis is derived from the complex potential of movement at the SI or sacroiliac joint and at the pubis. Because of the SI joints peanut-like shape it allows for a multitude of movements as the spine rotates and the legs move. Here are some of the basic movements:

nutationSacrum

Nutates – Anterior or forward rotation of the sacrum
Counter nutates – Posterior or backward rotation of the sacrum.

*When you flex the hip as in a plie the scrum nutes allowing for a gentle increase in the lumbar curve. When you extend the hips as in standing up from plie the sacrum counter-nutates allowing for a lengthening of the lumbar curve.*

Further resources on nutation/counter-nutation: http://www.physio-pedia.com/Sacroiliac_joint

Innominate Bones

The two halves of the pelvis can both rotate, slide up and down (lateral flexion), and forward and back (abduction/adduction) at the SI joint.

With the movement of the legs:

When the right leg is forward/loaded the right innominate rotates posteriorly and slides up on the right side (laterally flexes).
When the left leg is back/unloaded the left innominate rotates anteriorly and slides down on the left side.
And vise versa as in walking.

With the movement of the hip joint:

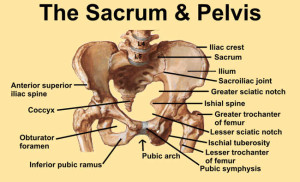
When the hips are flexing the superior aspects of the innominate bones (ASIS) narrow while the posterior aspects (ischial tuberosities) widen.
(This is happening in conjunction with the sacrum nutating as hips flex).

When the hips are extending the superior aspects of the innominate bones (ASIS) widen while the posterior aspects (ischial tuberosities) narrow.
(This is happening in conjunction with the sacrum counter-nutating as hips extend).

In addition:

When the hips are flexing the ASIS are also adduction slightly (narrowing anteriorly).
When the hips are flexing the ASIS are abduction slightly (narrowing posteriorly).

sacrum_pelvis

What the femurs do:

When the hips flex the femurs externally rotate.
When the hips extend the femurs internally rotate.


What the abdominals do:

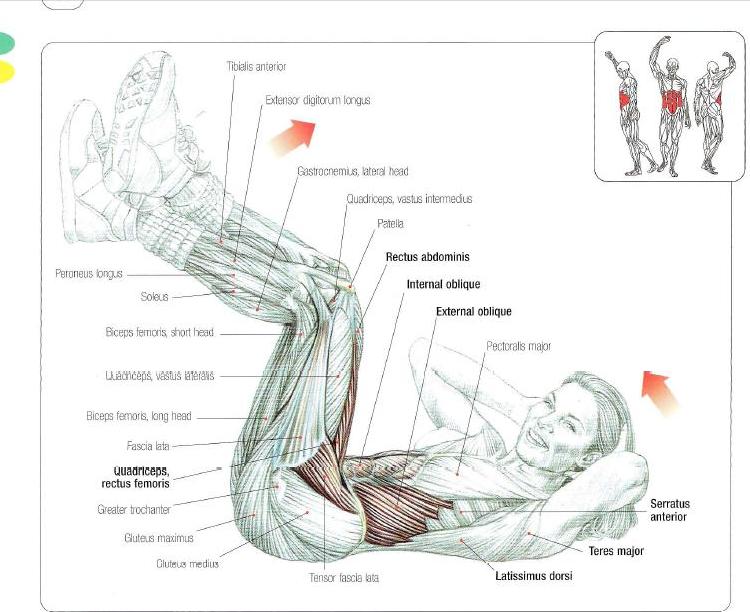
When you flex the hips and the ASIS narrow (sitz bones widening – pelvic floor eccentrically contracting), the transversus abdominis concentrically contracts drawing the waist in and up (narrowing muscularly), and the external obliques concentrically contract.
When you extend the hips and the ASIS widen (sitz bones narrowing – pelvic floor concentrically contracting), the transversus abdominis eccentrically contracts drawing the waist back to it’s original shape (wider muscularly), and the internal obliques concentrically contract.


The conclusion:

When we flex and extend the hips as in walking the SI joint ends up “tumbling” (Reference: Eric Franklin) moving in a counter-rotating spiral like the infinity sign. This movement radiates up the spine creating additional counter-rotation between the upper and lower halves of the body.

Therefore even a “stable” pelvis, one that is well organized and can stay balanced under the spine on top of the femurs, should have movement and hence promote healthy rhythms of rotation throughout the body (including at the knee, ankle, foot, shoulder joint, head and neck).

“The slight but important rotating, sliding, gliding, and pivoting action of the sacroiliac facets serve as the singular link point where the axial skeleton is attached to the pelvis; thus the necessity of this joint being bilaterally strong and slightly mobile to adapt for biomechanical impairments deficiencies above and and below.” — Chapter 6 from R. C. Schafer, DC, PhD, FICC’s best-selling book: “Motion Palpation”


For further study of the sacroiliac joint and the movement of the innominate bones of the pelvis check out this AMAZING resource:
The Low Back Site: The Sacroiliac Joint – Richard DonTigny, PT

Stability – When is it too much?

Okay, so here”s the deal…This past weekend I had an AMAZING group of teachers at my studio for our Reformer 1 training. Eleven of them eager to learn, practice and explore. These weekends are always such a wonderful experience for me because I learn so much. I learn from watching the students move, hearing their questions and concerns, watching them teach, and just being in the space with them as their path to becoming GREAT teachers unfolds.

Not unlike many of these past weekends I had a total moment of clarity about something. This time it was “stability.”

core stability


Here”s what happened: We start each day with a mat class. Saturday morning we were midway through doing an advanced version of the side-lying leg series. This is not an easy exercise to execute due to the fact that you are propped up on one elbow with the other arm in the same position pointing toward the ceiling. We were definitely focusing on upper body stability, as this is — in my mind — the most challenging aspect of the exercise. However, something was amiss.

“Alright, let”s stop,” I said (with love in my voice :). “What”s going on in your legs here? No one is moving. You are all working to keep the pelvis and torso so still your legs aren”t moving and you”re looking like if you were walking you”d be in pain! (insert giggles here). See if you can let the leg swing a bit more, stretch the hamstring as the leg comes forward, stretch the hip as the leg moves back. Feel that even though the pelvis can be stable the legs are free to move and the whole upper body can also ebb and flow enough to create a gentle counter balance. Let your body move for heaven”s sake!”

WHAT? Let the torso move back and forth?!#$&! I”ll tell you that some of the students looked at me as if I were speaking an entirely different language.

And here in lies the seed for concern.

Yes, it”s true that as movement teachers we are often concerned with establishing a level of stability in the body that enables our students a sense of center, groundedness, and balance.

Yes, it”s true that for a large portion of the population a lack of the connection between legs and pelvis, arms and upper back or shoulder girdle creates a tremendous amount of disassociation and even pain in the body.

But it is not true that stability is the key, and always the key, to these challenges or disconnections.

There is a truth in the body that goes like this: In order to have stability we must have mobility. The body is never static. It is always moving, adjusting, correcting, contracting and expanding. At least a well Som i et traditionelt kasino byder TivoliCasino deres brugere velkomne til at prove lykken pa alt fra spilleautomater til roulette, BlackJack , poker og meget andet. functioning body is. If we train a body to be “stable” in places where there is not first “mobility” or healthy movement we enter into a battle of effort against effort — essentially training stability or strength on top of tension. Effort plus effort does not equal ease. And isn”t that our goal, a balance between ease and effort producing efficiency, balance, and control?

In order to restore balance and stability in the body we should seek out, in each individual student — as every case is different — where the body needs mobility and where it then needs stability.

As Pilates teachers in particular I believe, and have witnessed and been victim to, the thought that stability is always the answer. In the first half of my Pilates training as a student I was taught to always draw my scapula down, to “anchor” them into my back, so much so that for quite some time my serratus and lower traps became so tight that I was in chronic pain around my shoulder blades, my collar bones began to slope down, and my middle back became excruciatingly tight.

I have also seen the low back and pelvis become so rigid in students from constantly keeping it still that the low back lost it”s ability to be malleable and participate in side bending and rotation effectively, therefore limiting movements in the hips and legs not to mention articulation through flexion and extension.

Unfortunately, I think that as teachers we take concepts that are appropriate for some bodies or essential for new students and never evolve beyond those principles to explore what”s next, to reach out and discover beyond neutral spine and stable scapula what the body”s potential for movement is!!

We get fixated and stuck teaching “core stability” using terms like anchor, root, hold, pin together, knit together etc. even when stability has been established and we should instead be looking at the truth of the body and how to integrate it”s new connection to core to find freedom in our movement.

With the example of the teachers in training this week and the advanced side-lying leg series, it seemed to me that they were primarily working under the assumption that stability and not freedom of movement was their key objective.

What I would say is that at this point most of them had established a substantial core connection and could maintain stability in the pelvis enough to feel the differentiation between hip and leg (attuning to femur glide with ease), and therefore could have been exploring the the potential for an integrated body/whole body movement.

In this particular example what we miss out on is an opportunity to practice and hence promote the body”s natural counter-rotational action through the spine — the interplay between the upper body subtly rotating one direction while the lower body rotates the other direction. THIS IS WHAT HAPPENS IN WALKING!!!!

When we walk the right leg goes forward, the right side of the pelvis rotates back, left ribs rotate forward with the left arm swinging forward, left leg is back, left side of the pelvis rotates forward slightly, and the right ribs rotate back with the right arm swinging back. Counter-rotation, opposite and balancing spirals. This is the true rhythm of the body.

There is, of course, a very appropriate and necessary time and place for stability, but I would encourage you not to lose yourself in it being the primary goal ALWAYS.

I would also encourage you to open yourself up to looking at how you teach stability:

  • Do you teach stability with mobility?
  • Do you teach mobility, release, opening, access as a precursor to stability?
  • Do you teach stability as always the goal?
  • Do you balance stability and mobility?
  • Do you give your students an opportunity to explore their body”s potential, to increase range and allow for movement in the pelvis, spine etc.?

Here”s another truth: The spine is meant to move (Amy Taylor Alpers helped me understand that one!). The pelvis is meant to move – it moves in rhythm with the legs, the low back and within itself (for more information on this click here). The scapula are meant to move — healthy elevation and depression, adduction (retraction), and abduction (proctraction).  The ribs are meant to move — expanding and contracting, rising and falling.

THE BODY IS MEANT TO MOVE! See how you can promote healthy movement in any given body, on any given day, under any given circumstance and see how it feels. Throw stability to the wayside (if it is not harmful to do so — and sometimes it is) and see what the body does when it is required to find it”s potential. I think you will find it is liberating and in no way means that you must forsake establishing stability or core strength or stop teaching “stable pelvis” in the side lying leg series 🙂 It simply means that you have opened your eyes to more than fixing the body in a position, but that you have given yourself a chance to see when stability is key and when it is not.

Enjoy your explorations and PLEASE feel free to ask me questions, offer your comments and explore this topic further with me. I LOVE  talking about it and clearly have a very strong opinion 😉

Be well,
Chantill

P.S. If you want to learn more about the dynamics of the pelvis during movement CLICK HERE.